In the article we talk about how we help inventors defined prototype features by writing the client story.
After realizing an opportunity in the marketplace, how do you define the features needed in a prototype and what should a prototype look like and do? In this article we’re going to walk through a way how to come up with specifications needed to build a good prototype.
A good prototype can be like a glimpse into the future. It can help you envision and work through all the details to have a well thought-out product that serves and delights your clients. Also, most times with a little bit of luck and persistence you will get incredible insight into additional features that could be game changers, things you didn’t even think about that could potentially be amazing addon or main features.
However, at this point you don’t have a prototype to learn from you’ve got an opportunity a hunch an untested idea. So how do you start on building a prototype? How do you organize your thoughts that will eventually become a prototype feature set?
To start your journey to a good prototype we start with the your customer story. The better the story the more realistic it is the better the specifications will be for your first prototype.
This is a story that draws contrast between what life was like before your product and what life is like after acquiring your product or service. The most important part of the story is that it’s not a fiction but more of a documentary. The best documentaries are written by observing your future clients and conducting interviews. So take the time and go out there and observe and interview your existing and potential clients.
Here’s a step-by-step how to build out your story from the following questions.
- Who is the main character of the story, who is the hero? Here’s where you want to go into details and create a backdrop to your character. Think of this is like a beginning of a good story in a book or movie where you get to meet and relate to the main character. What is their normal day-to-day like? Give your main character fictional name you can refer to.
- What is their life like before they encounter your product. What are they doing currently there is a pain or problem. How do they solve this problem currently?
- What happens when they encounter your product and or service for the first time. What does the product look like to them? What is the set-up process like. What are the main features?
- How does your product solve their problem in a meaningful way that either saves and or makes them time and money.
- How much will this product and service/monthly cost my client? Will they be able to afford it? Will it be a no-brainer for them to buy it? How so?
Here’s an example of one such story we worked on with our client CloudGuage:
- The main character is a guy name John. He’s a very busy building manager that starts his day very early around five in the morning and working long days to make sure that tall the building in large campus are safe. He’s in charge of making sure that every fire hydrant is inspected and under pressure, every exit sign is lit, all the boilers are working within spec, everyone has hot water. He does not like to micromanage and that’s why he has systems in place for everything to run smoothly.
- Currently John must physically walk around every single building every floor to make sure that all the fire extinguishers are inspected at least once a month. He must physically make sure that all the exit signs are lit in every hallway of every floor. He must make sure that all the defibrillators in the main lobby and in the cafeterias are charged by looking at the gauges and documenting where he already checked so he doesn’t waste time on double checking the same fire extinguishers and Georgia simulators or exit signs. He must physically visit all the boiler rooms to check on all the gauges. This takes up a lot of his time and when he does not have time, he hast to rely on his team to do the checking.
- When John first encounters CloudGauge he understands right away that this could save him a ton of time and resources. The set-up process is simple he attaches a small device on every fire extinguisher, exit sign, defibrillator, and gauges in the boiler room that are easily connected to the Wi-Fi as an IOT device. After the initial install he could see every single fire extinguisher, boiler, defibrillator gauges, exit signs on demand and if there is an issue it lets him know through notifications in a to do list. He can easily assign them to do list to his team right from the portal.
- Now John doesn’t have to physically go around and take notes on all the Fire extinguishers, defibrillators, boiler room gauges. Instead, he could cut down on his overhead cost and streamline the process. With that he saves hundreds of hours per year on the daily weekly and monthly inspections.
- The cost per device must be free to the client for the hardware and have a small subscription fee per device that can be paid yearly into the future. this product will be a no-brainer for John to buy since will save them hundreds of hours of time and tens of thousands of dollars per year and man hours spent on physically checking all the gauges.
Next we refine the Must Have(MH) features by answering crucial questions from the story we just wrote.
For this we have a detailed worksheet called “Story to Prototype Worksheet”. It defines a step-by-step process to go from the story to the prototype feature set.
These features will be used to build a functional prototype without wasting time and money and getting closer to the real-world product.
You can download your free copy of our Story to Prototype worksheet that has helped multiple of our clients define the features for the prototype.
After all of the MH features are identified, the next step is to design a picture like rendering of the potential product. If this is a physical product, it would be a rendering of a physical design. If this is a portal or an app, this would be a mockup.
In the case of CloudGauge, this is what the renderings looked like.


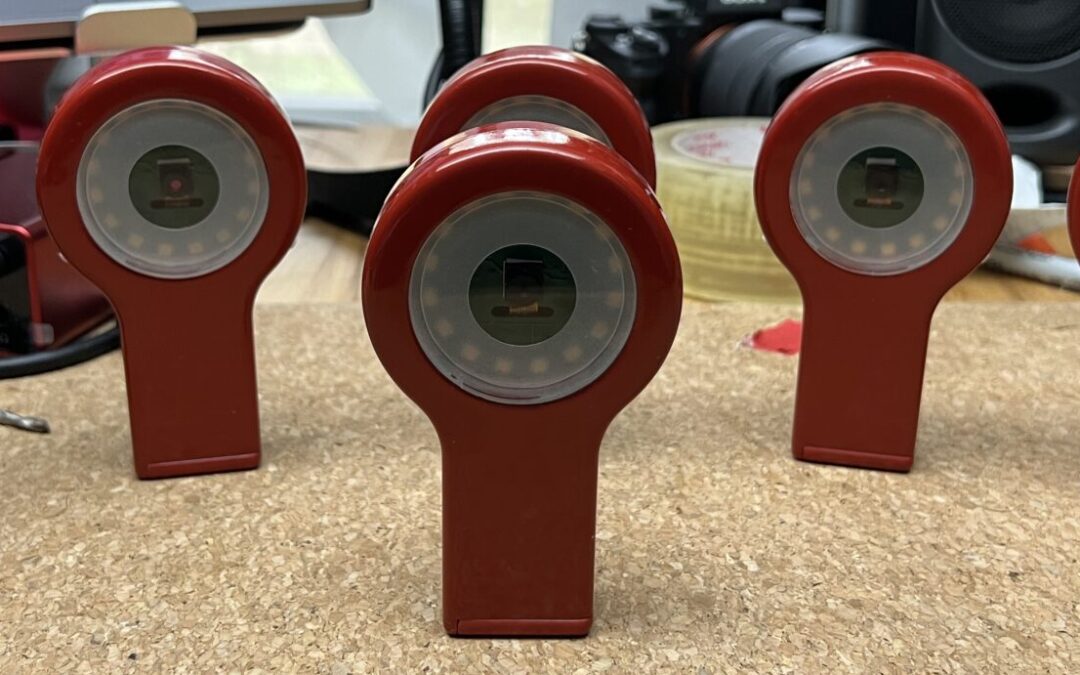
After the renderings were complete, and we’re able to gather some feedback from potential clients we decided to start on the prototype. This prototype would closely resemble the renderings. In this case we built a physical prototype, along with a customer portal. It looks like this.


After the prototypes were built and functional, we got it into the hands of our potential clients and begin testing them. This process we call the protocol pilot. The steps crucial, because here is where we get to understand what works well and where the potential pain points are, and what can be improved.
We have learned a lot from the pilot. For instance, the color of the devices needed to be red, not green to closely match the fire extinguishers and the defibrillators. We also learned about key features for the portal that our potential client pointed out that were super obvious to him, but not to us.
With that information we built a version two of the prototype and ran another pilot that went a lot smoother. This process has taught us everything we need to know and better define and build a prototype that has a great potential for proof of market fit.


The next step was to define the pricing model that would work for the customer. This part is very important to because from here we will know what margins we can predict after selling the product. Since we ran two pilots with a creditable organization that was CloudGauge’s potential client, we were able to ask them these questions, and they provided us with a good understanding of how much we can potentially charge per device. With this information we were ready to move onto the next step, and that is designed for manufacturing.